First article in series on building games, that are easy to maintain.
last checked with Phaser 3.12.0 – beta 2
Goal
Many tutorials show you, how to build game. Let’s say, you already have one. And because it is good and catchy, sponsors are interested in it. Your nice and clean code is step by step polluted with sponsor specific APIs. Maybe, even worse, you are maintaining separate project for each sponsor and fixing bug in one file needs some synchronization into other projects. Or game is built on your libraries and you add some feature, you would like to propagate into all your games. Or you need easy way how to parameterize game globally or individually for specific sponsor.
In this series I would like to address these issues and build game, that is easy to maintain. With one change of parameter, you can build for another sponsor or you can easily parametrize it without rebuilding, etc.
Project structure
First, we will build our project structure. Start with empty project and create following folders:
- assets
- css
- js
- lib
- src
Create file index.html and put it into root. This is content of of it:
<!DOCTYPE html>

<html lang="en">

<head>
    <meta charset="utf-8" />

    <title>Maintainable Game</title>

    <link rel="stylesheet" href="css/app.css" type="text/css" />

    <script src="js/es6-promise.auto.min.js"></script>
    <script src="js/phaser.js"></script>
    <script src="js/maintainable_game.js"></script>
</head>

<body>
    <div id="game_content"></div>
</body>

</html>
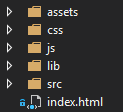
Your project should now look like this:
Create new file tsconfig.json on the same level as index.html and put these lines into it:
{
  "compilerOptions": {
    "forceConsistentCasingInFileNames": true,
    "noImplicitReturns": true,
    "noImplicitAny": false,
    "noEmitOnError": true,
    "removeComments": false,
    "sourceMap": true,
    "target": "es5",
    "lib": [ "es5", "dom", "es2015.promise", "scripthost" ],
    "outFile": "js/maintainable_game.js"
  },
  "include": [
    "lib/**/*",
    "src/**/*"
  ],
  "exclude": [
    "node_modules",
    "wwwroot"
  ]
}
This is our configuration file, that will say to Typescript compiler, what files to take, what file not to take and what to do with it. In Include array we are specifying, we want to tak all source files from folders lib and src. We want to merge all into one output “maintainable_game.js” in js folder. In lib array, we are specifying libraries we want to use. As we will use asynchronous functions in later chapters, we want to include promises.
Now, let’s go through folders and add files into it:
assets
leave it empty for now
css
create app.css file and put it inside. It is as short as this:
body {
    background: #000;
    margin: 0px 0px 0px 0px;
}
js
Copy phaser.js and phaser.min.js here. Also, as mentioned, we will use promises, so we need polyfill in case it is not supported by target browser. You can get ES6 Promise from here. This is how my js folder looks after adding all files:

lib
Take Phaser Typescript definitions (phaser.d.ts) and put it here. Be patient, Phaser is still under rapid development, so there is really a lot of bugs in it. Fortunately, it is usually easy to fix.
src
Files in this folder are more complex, so it is described separately in next section.
Adding source files
First file we add into src folder is App.ts:
namespace App {

    // game
    export let game: Phaser.Game = null;
}

// -------------------------------------------------------------------------
function launch(): void {

    let game = new MaintainableGame.Game();
    App.game = game;
}

// -------------------------------------------------------------------------
window.onload = launch;
Here we create new namespace App, that stores reference to instance of Phaser game. It is set to null by default. Later in game, when we will need to get this reference from any point, we can simply write: App.game. We set this reference in launch() method, which is called when our page with game loads. Now we are missing Maintainable.Game class, so let’s add file Game.ts into src folder:
namespace MaintainableGame {

    export class Game extends Phaser.Game {

        // --------------------------------------------------------------------
        constructor() {

            // default renderer
            let renderer: number = Phaser.AUTO;

            // init game
            super(
                {
                    type: renderer,

                    parent: "game_content",

                    width: 800,
                    height: 600,

                    title: "Maintainable Game",
                }
            );

            // states
            this.scene.add("Boot", Boot);
            this.scene.add("Preloader", Preloader);
            this.scene.add("Menu", Menu);

            // start
            this.scene.start("Boot");
        }
    }
}
There is nothing special – we simply create Game class that extends Phaser.Game. In constructor we pass parameters to super class (Phaser.Game) and we specify type of renderer, parent div element on page (see index.html), size of game canvas and name of our game. Then we add three scenes and launch Boot scene.
Before I list code for all three scenes, let’s add folder named “Scenes” into src folder. As first we will add file SceneBase.ts into it. This will be base for all our scenes and it will hold some methods, that are either used by all scenes or are simply convenient to have in every scene. This is, how it looks like:
namespace MaintainableGame {

    export class SceneBase extends Phaser.Scene {

        // --------------------------------------------------------------------
        public get gameWidth(): number {
            return this.sys.game.config.width as number;
        }

        // --------------------------------------------------------------------
        public get gameHeight(): number {
            return this.sys.game.config.height as number;
        }

        // --------------------------------------------------------------------
        protected setView(): void {
            // focus on center
            this.cameras.main.centerOn(0, 0);
        }
    }
}
For our convenience there are two getters: gameWidth and gameHeight. In Phaser 3 it is much more difficult to get these than in Phaser 2, where you simply wrote game.width or game.height. setView method is another handy method for me. It sets camera to center on coordinates 0, 0. Setting you camera in right way can simplify your game code a lot. For tetris like games I usually set camera so 0, 0 is in bottom middle. Centering on 0, 0 and placing gameobjects around it can save you a lot of work when you start to solve various screen sizes and resizing.
We will now use SceneBase class as base scene for our three Scenes. Add them one by one.
Boot.ts:
///<reference path = "SceneBase.ts" />

namespace MaintainableGame {

    export class Boot extends SceneBase {

        // --------------------------------------------------------------------
        public create(): void {
            console.log("Boot");

            this.scene.start("Preloader");
        }
    }
}
Preload.ts:
///<reference path = "SceneBase.ts" />

namespace MaintainableGame {

    export class Preloader extends SceneBase {

        // -------------------------------------------------------------------------
        public create(): void {
            console.log("Preloader");

            this.scene.start("Menu");
        }
    }
}
Menu.ts:
///<reference path = "SceneBase.ts" />

namespace MaintainableGame {

    export class Menu extends SceneBase {

        // -------------------------------------------------------------------------
        public create(): void {
            console.log("Menu");

            // bacground color
            this.cameras.main.backgroundColor = Phaser.Display.Color.ValueToColor(0x808080);

            // focus on 0, 0
            this.setView();

            // red circle
            let graphics = this.add.graphics();
            graphics.fillStyle(0xff0000);
            graphics.fillCircle(0, 0, 50);
        }
    }
}
All in all, it does very little. It only falls from Boot, through Preloader to Menu. In Menu it sets grey background color and displays red circle in the center. But we have basic project setup finished. Your complete project structure should now look like this:
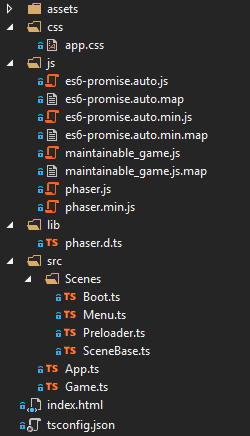
Of course, it may be “polluted” with other files and folders generated by IDE of your choice.
Conclusion
We have basic project set. In next part we will load general game config, which will allow us to parametrize game without need of rebuild. Files for whole series are also put on GitHub (as I am using Visual Studio Community 2017, there may be some additional files specific to IDE).