This tutorial explains how to use Unity’s custom packages to share your common code between multiple Unity projects.
Let’s say you have some common code you use in your Unity projects – for example some bag of small utilities. If you want to use it in project, then one option is to copy it into Assets folder. You can do this for all your projects and then… you find some bug in code. You fix it, but then you have to copy it into all projects one by one.
It would be better, if there was some way how to keep code in one place and let projects “link” to it. Then projects would automatically use latest version with changes like bug fixes or new features.
Fortunately, it is possible with Unity’s custom packages.
In my case, I created two procedural map generators for two projects with some common base code. I wanted to share this common code between both projects, as I am still making changes in it.
I will show, how to turn it into custom package and how to consume package on project side.
Creating custom package
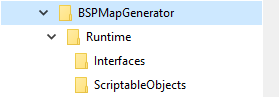
Create root folder for your package. In my case its name is BSPMapGenerator and it is on the same folder level as my Unity projects.
Look here into Unity doc what are conventions for package layout. We will have only runtime scripts, so we will place all of them into Runtime folder.
Under Runtime folder we will have a few more folders for keeping interfaces and scriptable objects separated. This structure is fully up to you.
Here is how our structure looks like:
Now, we will have to create two special files. First one, package.json, will describe our package. Second one will be assembly definition.
This is my package.json file. It is placed into BSPMapGenerator folder and there is only single file for whole package. Probably the most important is property “name”. Use com.<your-company-name>.<your-package-name>:
{
    "name": "com.sbc.bspmapgenerator",
    "displayName": "BSP Map Generator",
    "version": "0.0.1",
    "unity": "2019.1",
    "description": "Base abstract class for procedural BSP map generator.",
    "keywords": [
        "BSP",
        "unity"
    ],
    "category": "Unity"
}
Second file is assembly definition and it is specific for Runtime folder. If we had Editor folder, there would be another assembly definition. Also names are different. Again, look at Unity package layout convention. In my case the file name is SBC.BSPMapGenerator.asmdef and it is placed into Runtime folder. (if I also had Editor folder, I would name assembly definition file like this: SBC.BSPMapGenerator.Editor.asmdef)
Here is content of the file:
{
	"name": "SBC.BSPMapGenerator"
}
Using custom package
To use our newly created custom package open Package Manager window in Unity (Window -> Package Manager), click little + sign in top left corner, choose “Add package from disk…” and navigate to folder, where is package.json file.

After that, you can see your package is installed. You can also find your package under Packages folder in project files view.

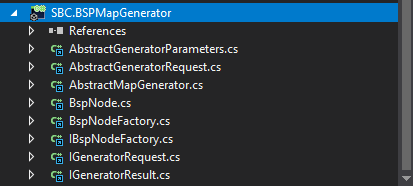
If you open Visual Studio (I am using VS 2017), your source files are listed there. Every single file has small blue arrow on it. It marks it as linked from different location. So, you can now edit your package files from project A and it will take effect in project B too.
Unfortunately, project generated for package (.csproj file) does not preserve internal folders structure. All files are put onto one big pile. Good news is, there is way how to fix it as Unity allows you to enter process of generating project files. But it is described in separate tutorial.